
Upon the request of 1 (one) friend, this month's journal will be a tutorial on how to create character mods for SM64COOPDX, a multiplayer PC port of Super Mario 64. For this, you'll need the following:
This tutorial assumes you have moderate experience in Blender. The reason Blender is required is because the template file that I will be working with is a .blend file.
Before we start, please make a folder for your character mod in the mods folder of SM64COOPDX. You may title it whatever you want, but be sure it has another folder inside called actors.
Please note: I'm not the best at explaining things, so if you don't understand, my apologies!!!
First, you'll want to decide the character you want to put into SM64. Preferably, choose a character that won't be as tall or taller as Waluigi; much taller characters tend to break the animations meant for a smaller frame like Mario.
Everyone's modeling process is different, but SM64 has a few rules to go by for its models. It has its own art style, and if you want to adhere to it, here's how I would go about it!
Unlike modern 3D models, Mario's model is very segmented. Every part, called a mesh, is its own segment and disconnected from the main body. This means that, for example, the thigh and lower legs are not connected. They appear connected with bones, which control the position and size of a mesh in animation. This gives the model a rougher look.
With Mario's base model, there are 17 different mesh segments. The wings from the wing cap are a part of Mario's model by default, however their appearance is toggled by the game depending on your cap state. It's possible to change where the wings appear on the model, however it is a little more tricky and advanced. It's recommended to keep it on the head.
Consider what would be your character's "cap": something they wear almost all the time, but can be seen without. It doesn't stricly have to be something on their head, but it's recommended. Other options are possible, like a necklace, collar, etc. If it isn't on the head, it can be on the torso, but that requires extra work to make the game control it properly.
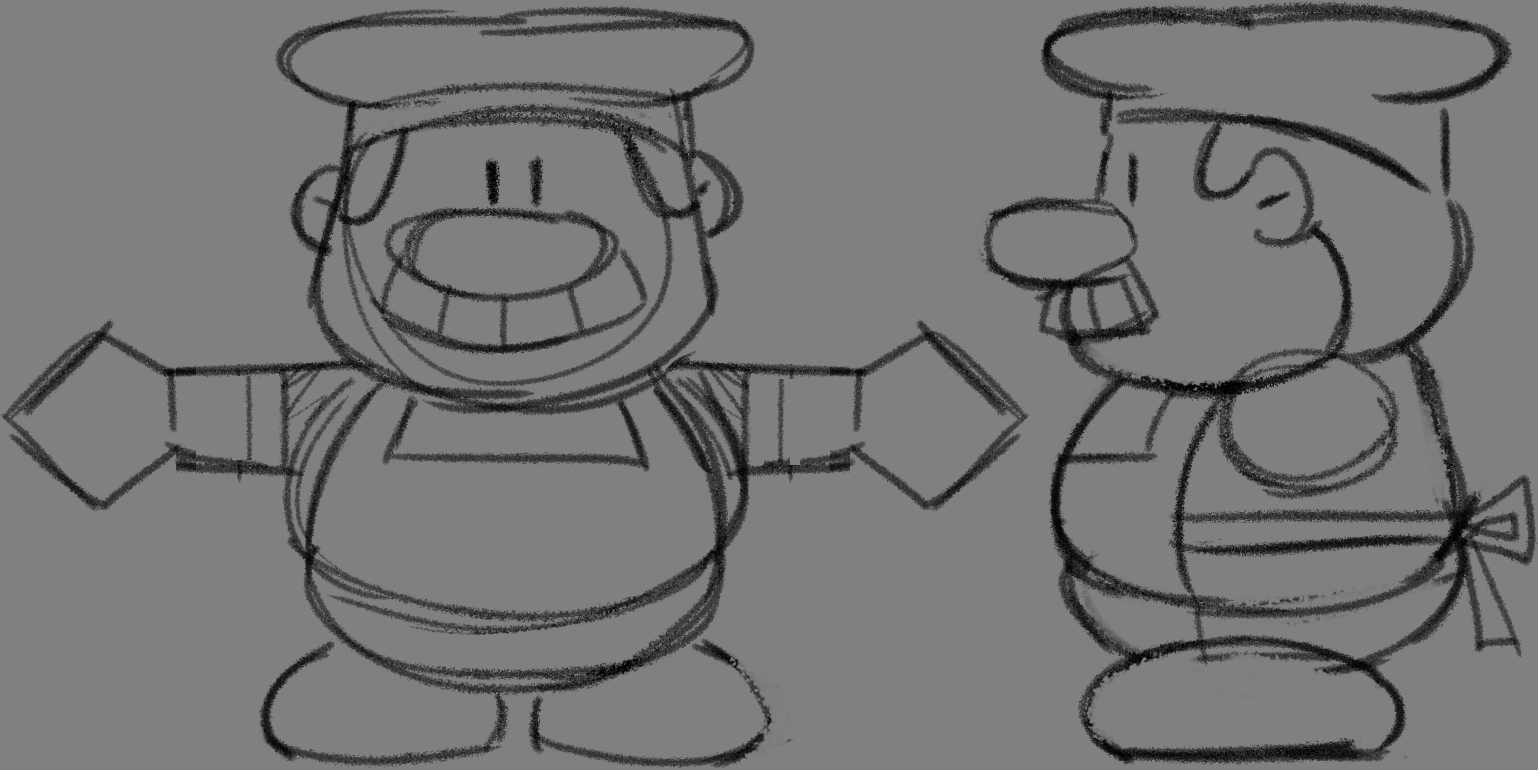
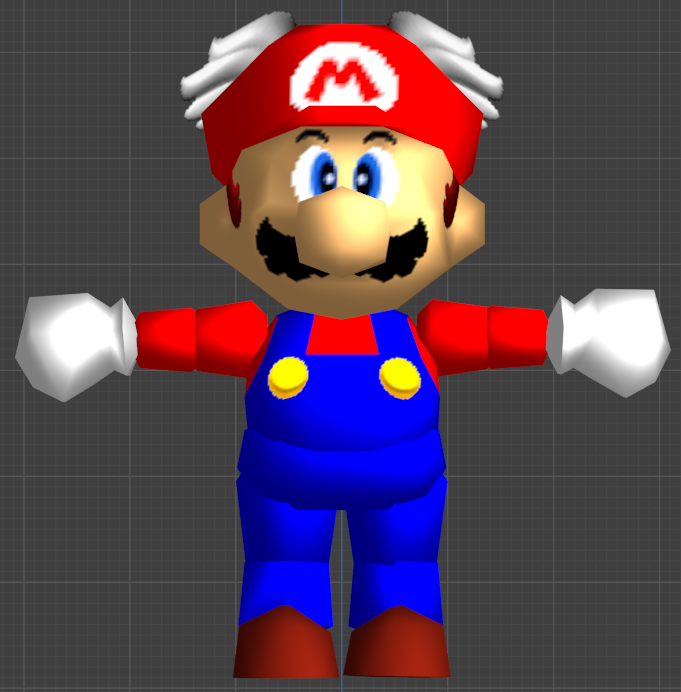
Before I go into the modeling process, something I like to do is I sketch out the model with a reference of Mario T-posing on the side. This helps keeps things proportionate and consistent with other character sizes. I tend to treat Mario as the universal unit of height measurement, so it may help to use him. One thing to keep in mind though is to model your character in the T-pose, so it makes it easier to replace Mario's mesh later.
Here's an examples of my sketches, and a base image of Mario t-posing for you to use if you'd like:
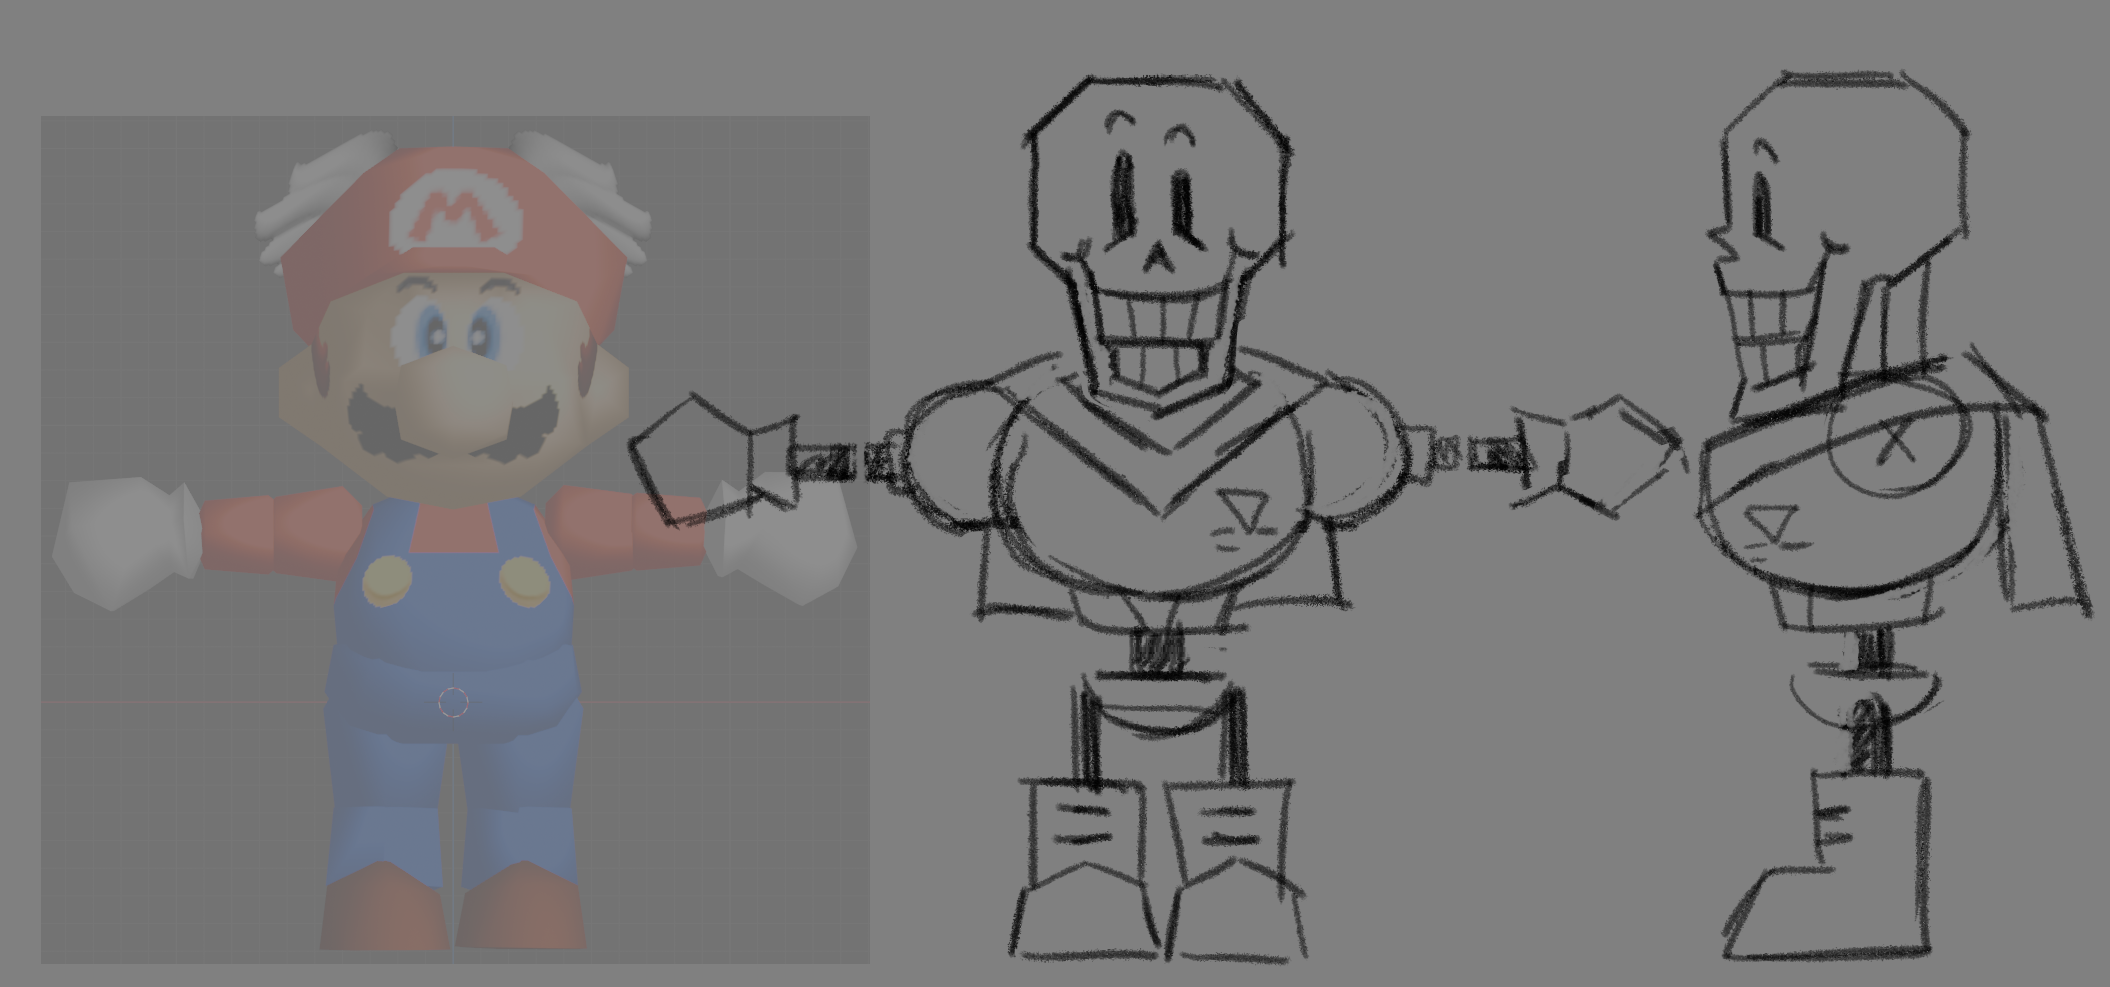
I would have showed my Sans sketch, but I accidentally deleted it while making this page... I'm actually pretty sad about that.
One more thing: to keep stylistically accurate to SM64, it's best to model in a low-poly style. This means your model will look more jagged and rough, but that's a part of the charm! Act like every triangle you save will make your very real Nintendo 64 run just that much smoother. For reference, Mario's base model is made of 768 triangles. Your model should be around this ballpark. Completely okay if you end up with less! Technically okay if you end up with more, but it may look out of place with other models.
A big part of modeling with a lower poly count is letting textures do the leg work in providing details. For example, Mario's moustache isn't it's own model with depth; it's a texture plastered onto his face! His eyes are like this, too, which easily allow for more cartoony expressions if needed.
In the release version of SM64, Mario has four eye expressions: Open, half open, closed, and dead. Dataminers and experts of SM64 will know that Mario actually has more than four eye textures left unused by the game: looking left, right, up and down. While these last four textures aren't normally used by the game, some mods of SM64COOPDX utilize these textures. It's best to make these textures just in case someone, including you, end up using a mod that utilizes these. If you truly do not want to, that is completely okay; we'll go over how to ignore these texture parameters in the model itself later.
In SM64, Mario's appearance is set by materials. This is where Mario gets his colors and face textures from. Each texture is it's own material that is often switch in and out depending on what the game asks for. In modern games, a character's color is often determined by the texture image. This isn't the case here, and works similar to vertex coloring. Except, instead of assigning each vertex, with a color, each triangle or face is assigned with a color. I call these "Solids." The reason that it's important for us to know this is to allow for the player to recolor their character model. By default, SM64COOPDX provides these as recolorable materials:
It's important to think about what part of your character you want to allocate to each material slot. You can use as little as two material slots, meaning only two parts of the character will be recolorable, but you cannot use any more than what was provided.
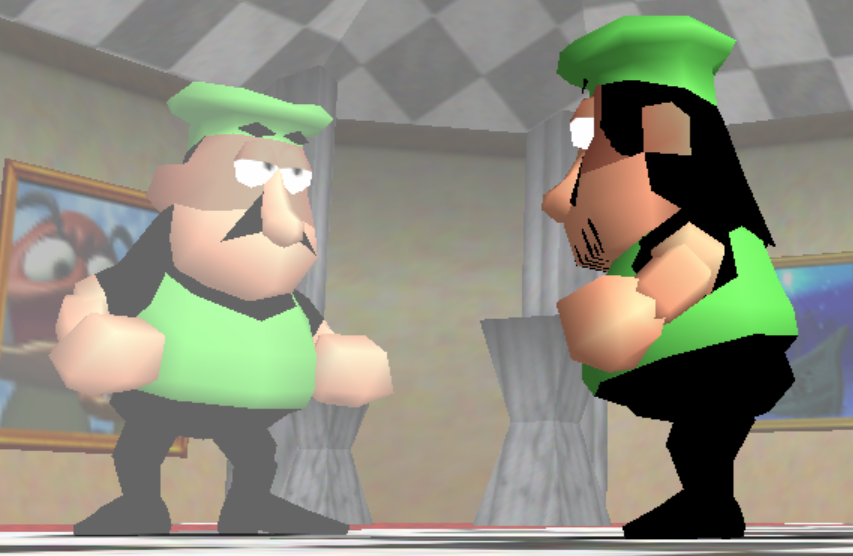
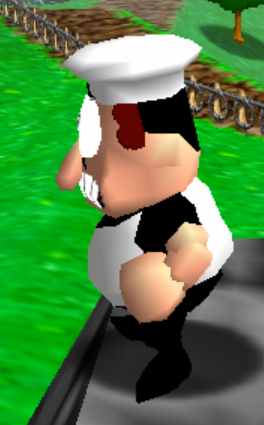
To provide an example, here's how I allocated each material slot with some characters I've modded in:
| MARIO | PEPPINO | THE NOISE | SANS | PAPYRUS |
|---|---|---|---|---|
| CAP | Cap | Jacket | Cape & symbol | |
| HAIR | Hair | N/A | ||
| SKIN | Skin | Bone | ||
| SHIRT | Tank-top | Cape | Shirt | Battle body |
| GLOVES | T-shirt | Gloves | Hood | Gloves |
| PANTS | Pants | Suit | Pants | Pelvis |
| SHOES | Shoes | Boots | ||
| EMBLEM | N/A | Yellow accent | ||
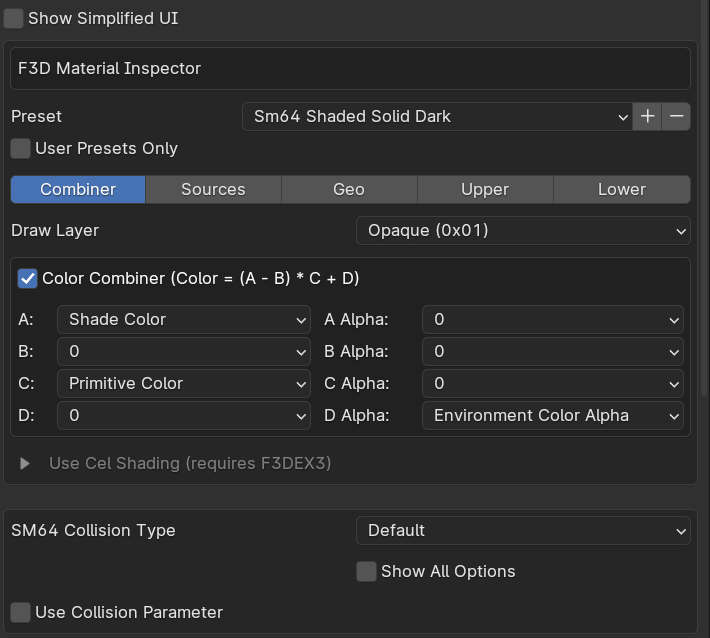
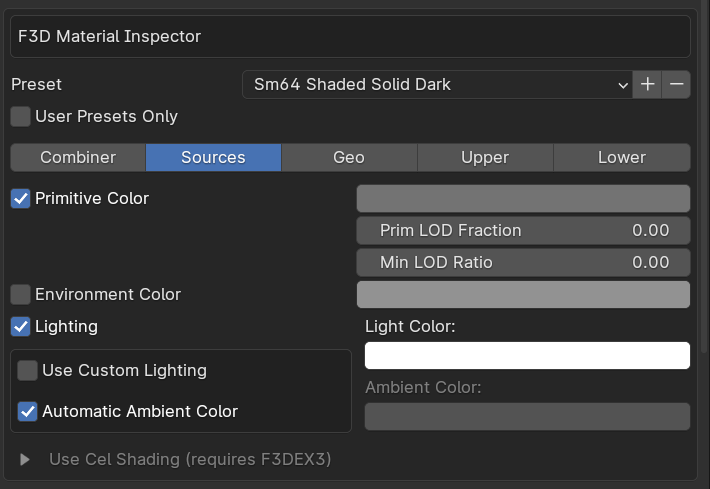
Even if you don't want your model to be recolorable, it's important to understand how materials work with SM64. Solids in SM64 will typically have the preset of "Sm64 Shaded Solid" and look like this in its settings under the "Sources" tab (be sure to turn off "Show Simplified UI!"):
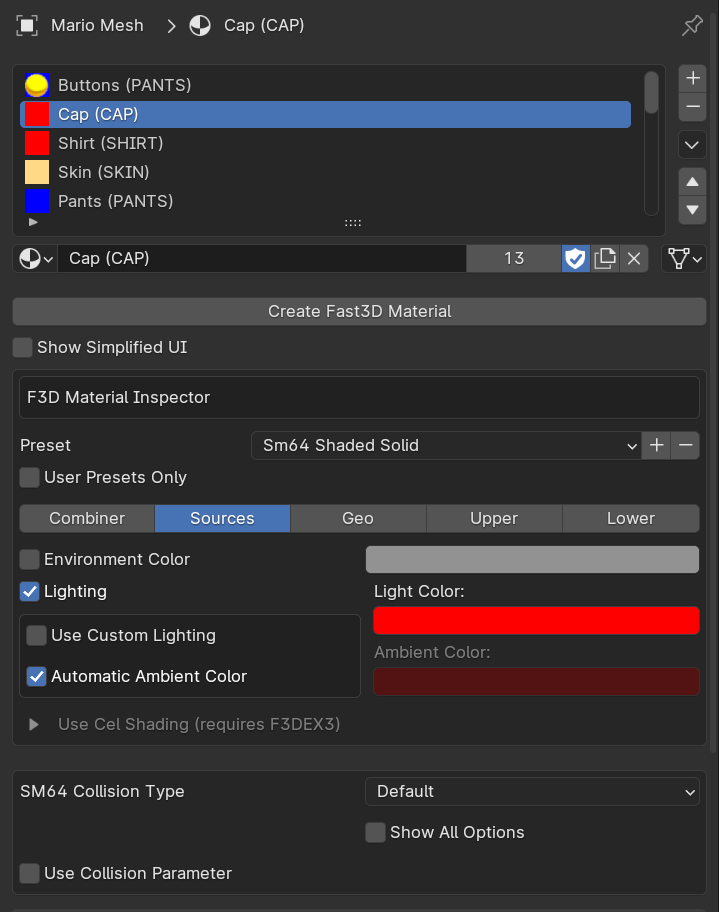
Its red color is determined by the "Light Color" property. The shadow color, labeled "Ambient Color," is automatically determined by the setting "Automatic Ambient Color." You can turn this off and change it, but it's not recommended.
There are many different ways to apply recoloring to a texture. Fast64 comes with multiple texture presets, allowing for easy material creation. It can be hard to understand what each preset is for. One of the best ways to understand is to look at Mario's materials in the template. You can also take a peek at this table for some pointers on what each preset does:
| Fast64 Preset | Displays solid? | Displays texture? | Recolors solid? | Recolors texture? | Has shadows? |
|---|---|---|---|---|---|
| Sm64 Shaded Solid | Yes | No | Yes | N/A | Yes |
| Sm64 Shaded Texture | Yes | Yes | Yes | Yes | Yes |
| Sm64 Decal | Yes | Yes | Yes | No | No |
| Sm64 Shaded Texture Cutout | No | Yes | N/A | Yes | Yes |
| Sm64 Shaded Texture Transparent | No | Yes | N/A | Yes | Yes |
You may have noticed that there are material presets where it recolors both the solid and the texture associated with it. It's impossible to tell the material what part to specifically set to what color; the only way around this is to duplicate the face, give it another material, and move it just slightly above its original position. It's hacky and tacky, but it works.
Another thing that you may have noticed is that Shaded Texture Cutout and Shaded Texture Transparent have the same properties in the table. The key difference is how they render the transparent texture; Texture Cutout renders the texture on a layer titled "Cutout," which the mirror in Peach's Castle will also render. These textures are rendered with a crisp edge, like cutting it out of a paper. Texture Transparent will render on the "Transparent" layer and not render in the mirror, alongside being rendered with a softer edge.
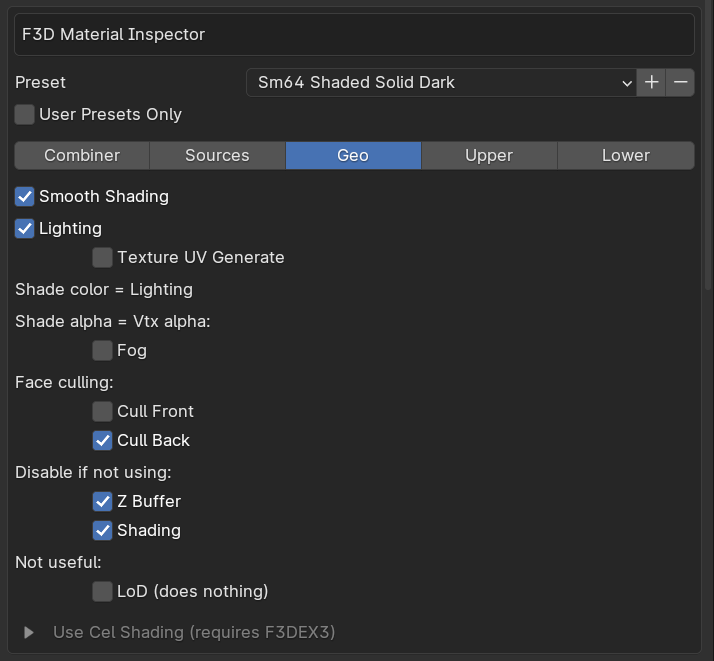
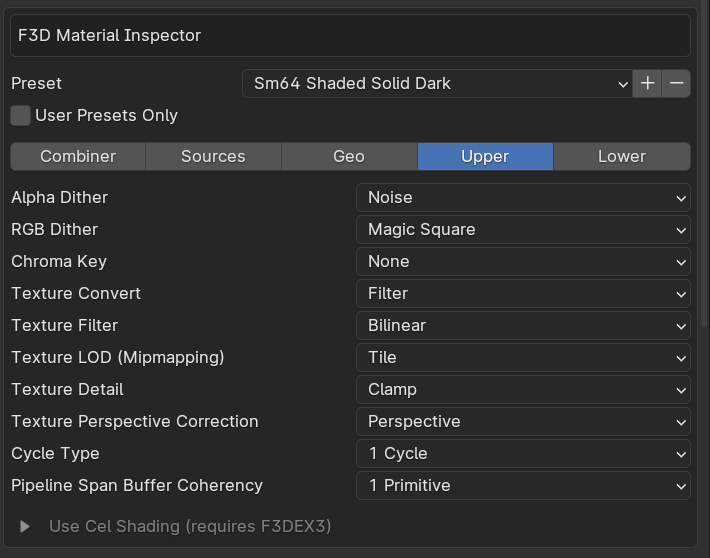
If you want a material that uses the same material slot but is a different shade, you can create a custom preset by pressing the plus sign on the preset dropdown menu. Here's a material I've titled "Sm64 Shaded Solid Dark" and the settings for it:

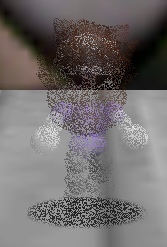
Assuming you've finished modeling, it's time to open up the template! It should look something like this upon opening:
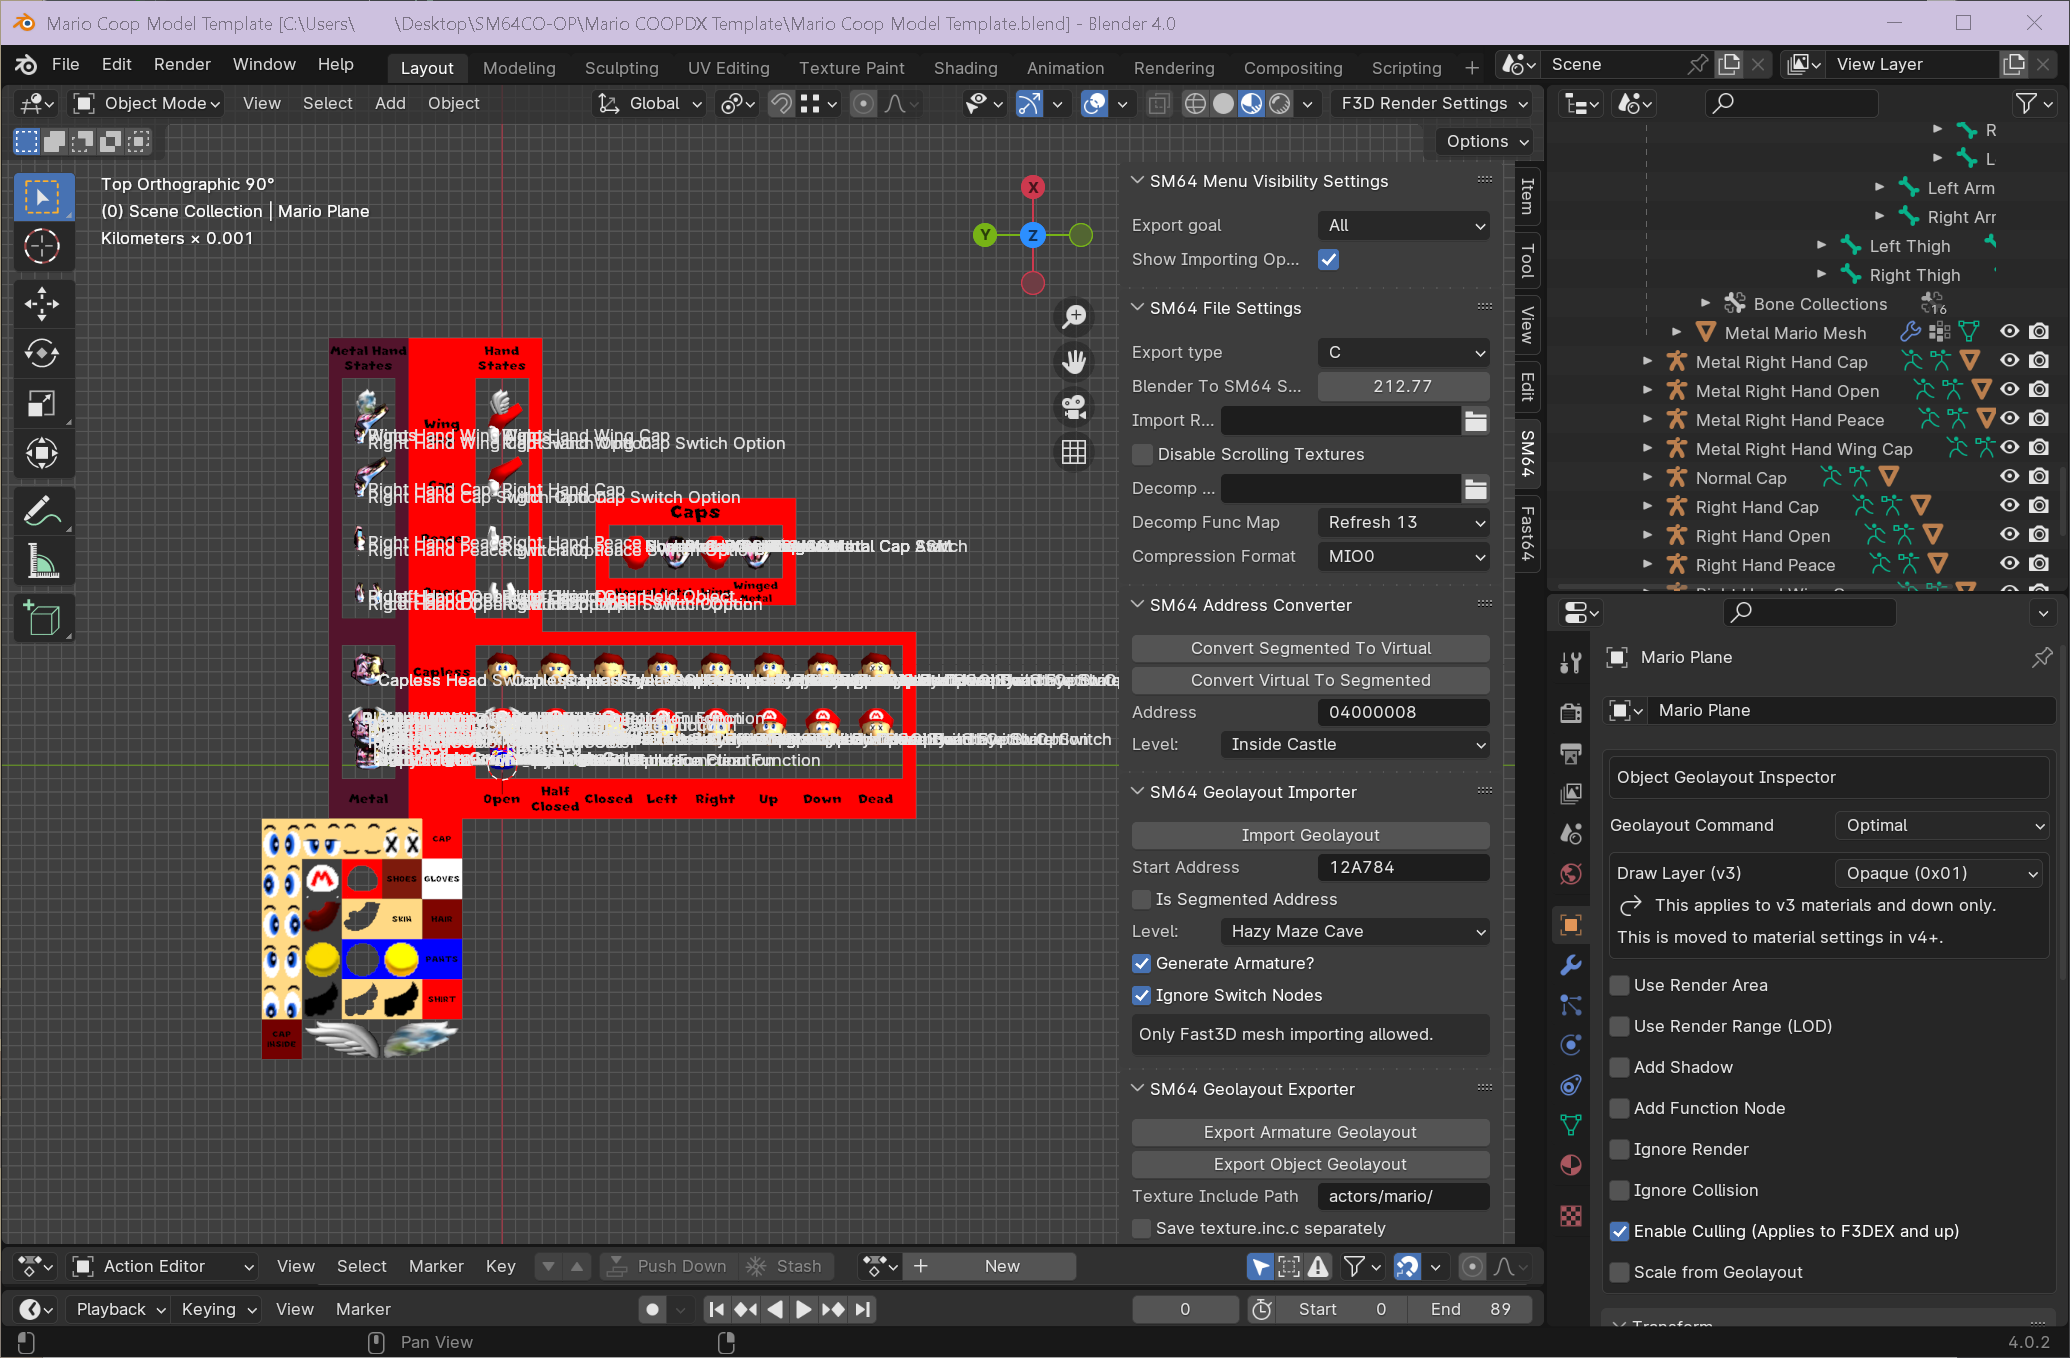
Everything looks scary and complicated, but I promise it's fine. There's a few objects you can delete to make things less overwhelming:
These don't do anything and more or less help keep track of where things are. Deleting them will not mess up anything. If you'd like to keep them, more power to you! For me, it's more clutter.
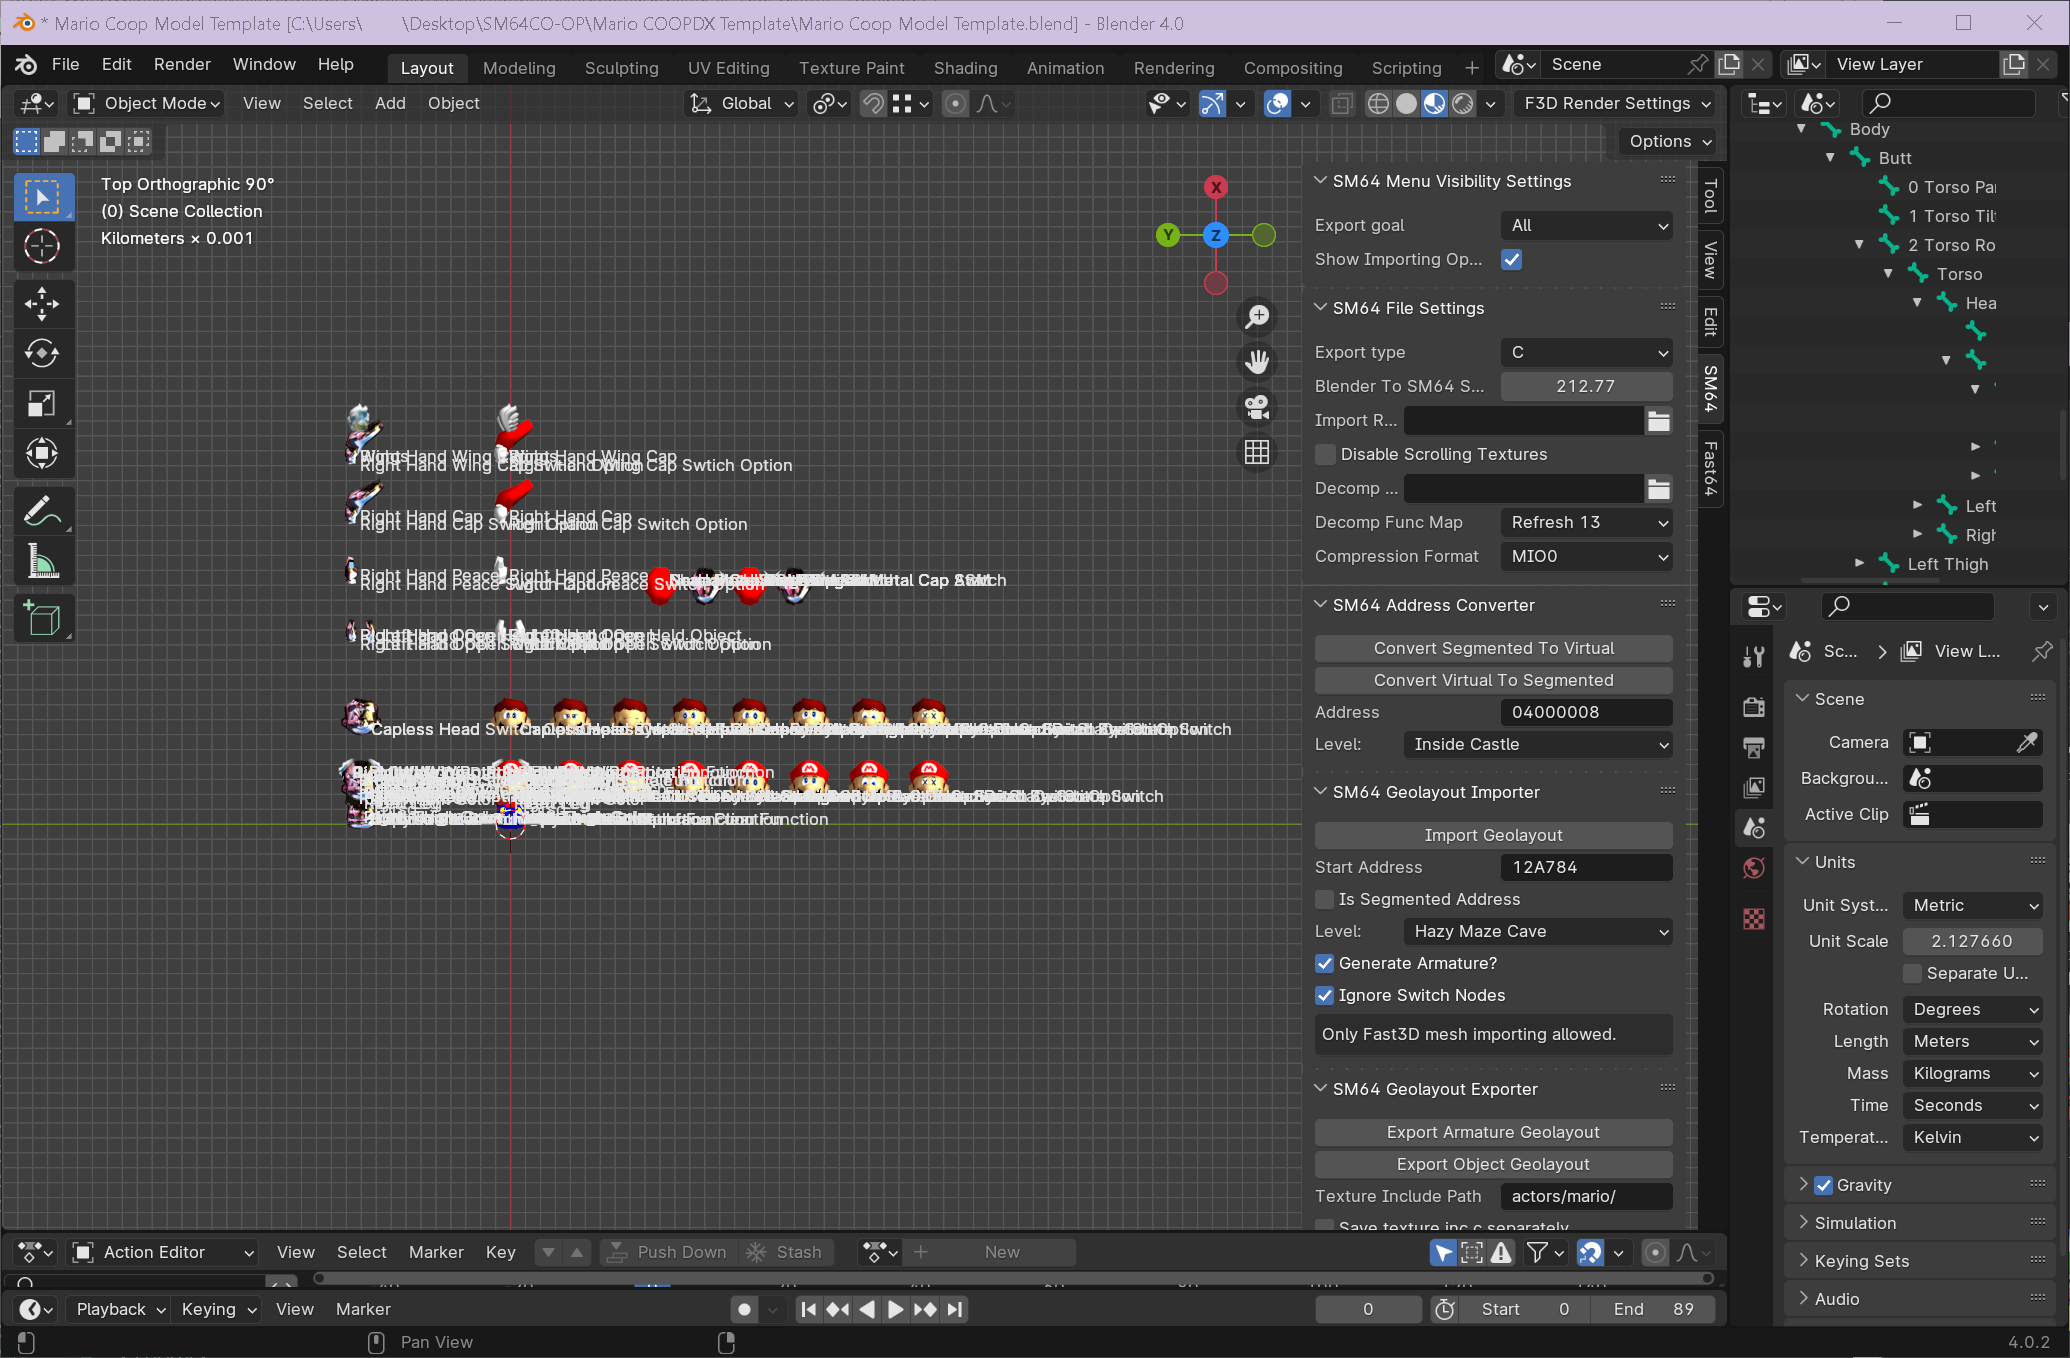
There we go! That's a lot cleaner. Now let's get to work.
By default, Mario will look like he's been crumpled up into a paper ball. Oddly enough, this is Mario's default pose in the game. I'm not sure why he's like this, but we'll make it work. Select the armature and enter Pose mode.
In Pose mode, you'll want to hide some extra bones by pressing H while selecting them to avoid editing the wrong ones and messing up the armature. Hide the following:
Now, select Left Arm, Right Arm, Left Thigh, and Right Thigh and rotate them along the Y axis by 180 degrees; positive or negative. This puts Mario's legs down and his arms at his sides. Select Left and Right Arm and rotate them by -90 and 90 degrees on the Z axis respectively to point them out. Select Left and Right Shoe and rotate them on the Y axis by 70 degrees to set his feet flat. And finally, select Left and Right Hand and rotate them by -20 and 20 degrees on the X axis respectively. Press the "Apply As Rest Pose" button.
Congratulations! You now have a workable Mario model that is now t-posing.
You may import your custom model into the template file now. Rotate the model accordingly so they are facing the same direction as Mario. Select the Mario mesh, enter Edit mode, and delete everything but the wing meshes. Exit Edit mode and delete all of the Mario materials except for the wings. Then, select the character model you've imported, and while holding Shift, select the wing meshes. Press Ctrl + J. Your character mesh is now joined to the Mario mesh, which is joined to the Mario armature.
This is where you'll have to start assigning vertex groups to your mesh. In Edit mode, select the icon that shows a triangle with three vertices. You'll see a section in the properties window titled "Vertex Groups." This is where you start assigning your meshes to the relevant group. The head goes into the Head DL vertex group, right thigh with the Right Thigh Color vertex group, etc. If you have multiple parts, like multiple right hands, assign them to the same vertex group for now. Move the wings if necessary. Then, when that's done, edit Edit mode and select the armature. Enter Edit mode and move the bones around as needed. The bones we've hidden earlier in Pose mode will show here, so do not worry about needing to unhide them. When that's done, it's time to re-crumple Mario. Or, well, "Mario."
This is also where I rename the armature from "Mario" to my character. This will not affect anything, but it will keep things more organized, I think.
Basically, just do the opposite of all of the transformations you've done on the bones here. Do not unhide any bones. Then, when everything is back in place, press "Apply As Rest Pose" again. Tada! You're done! Your character should be in the same pose Mario was originally in now.
... No, I'm not joking, it's that easy.
For the hand switch armatures, something I like to do is to select the relevant hand poses in the main armature and press the P hotkey. This gives the option of separating the mesh into its own object through three different ways; select "By selection." Then, move the mesh to the relevant switch armature, and join it with that mesh. You can rinse and repeat these steps for the rest of the switch armatures.
The hardest part of the process is arguably the switch bones. They're a bit of a pain, but can allow for some really cool customization. There are two main switch bones: the Eye State Switch, and the Cap State Switch. They're pretty self explanatory; one handles eye textures and one handles the cap state Mario is in.
Switch Bones allow for models to switch in and out parts or layers they render on. This is very useful when you want to change the way a character looks depending on the state their in. In a switch option, there is a property called "Type" that decides what the bone is switching out. There are three fields for this: mesh, material, and draw layer.
Mesh switching allows for the game to switch out a part of an armature for another part, effectively changing models. Depending on where the switch bone lays in the hierarchy, it can switch out only one part or the entire armature. Switching out one part is useful for instances where, for example, you want Mario's cap off. Switching out the entire armature is useful for swapping different models upon entering a cap state, like Metal Mario.
Material switching is helpful for allowing Mario to emote. This is what allows Mario to blink, sleep, and potentially even look to his left, right, above or below him. It's also useful for making him look like he's dying! Wild sentence, I know. This allows Mario to feel less statis and more expressive.
Draw layer switching is what toggles the wings on Mario. By default, the wings are set to a layer where they are not visible. However, upon getting the wing cap, the draw layer for the wings are changed to be visible and rendered by the game.
Understanding most of these switch types in switch bones is immensely important for creating a custom character in SM64. Be sure to note that switch bones can only switch out one thing at a time. This means dual switching, where it switches two materials at once for example, is impossible. All of these bones can only be modified in Pose mode, so before editing any of them, be sure to be in that mode.
Select the bone titled "Eye State Switch." It's located where the head bone is, so it might take some cycling to select it. Once selected, navigate to the properties window and select the bone icon.
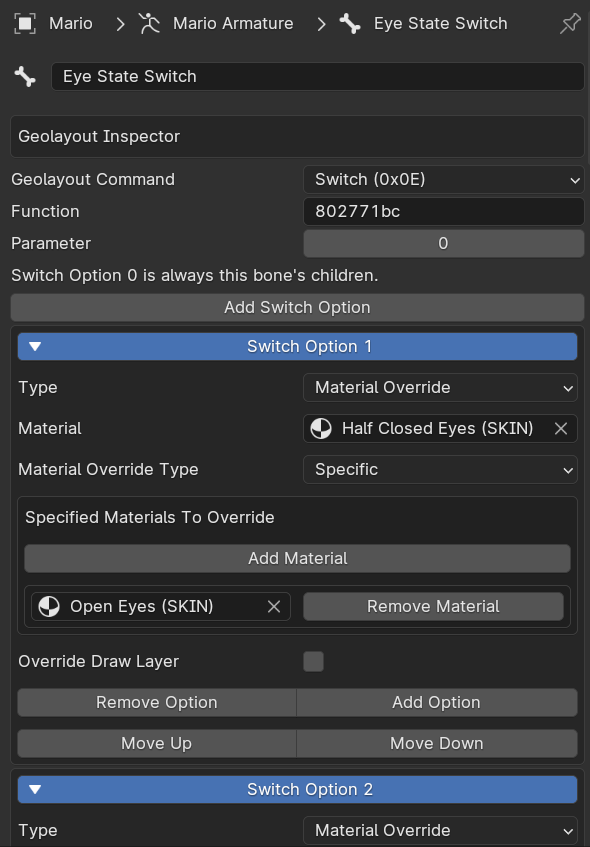
There are seven options here, all with the type of "Material Override." These switch out the material titled "Open Eyes (SKIN)" with the corresponding material. Because of how the game's internal structure is, the order must follow for its switch options:
If you want two textures to be changed at once, or you want an entirely new head model for an expression, you can change the type to "Mesh Override" and select the relevant armature. This will make it so upon the game calling for a certain expression, it will switch the head model to the relevant model instead of simply switching out materials.
This switch bone, located where the head bone is as well, only has one option; the capless state. This switches out the head model for another head model attached to an armature upon the game stating that Mario does not currently have his cap.
It's possible to have the game switch out another body part instead of just the head. However, this requires adding two new bones. For example, if you want only the torso to switch parts, you will need to create two bones, titled "Capless Torso Switch" and "Torso DL." The first is the switch bone, and the second is the model it will be replacing. Torso DL would be parented to Capless Torso Switch, and the switch bone would be parented to Torso. This does not mean you delete the original Capless State Switch Bone in the head. Because of how the game handles this function, it is important to keep this bone. You can set the bone's switch option to a Material Switch and have it change a material out for itself, effectively doing nothing. In the new Switch Bone, be sure that the Function parameter matches the original Switch Bone's Function parameter, and the Geolayout Command is set to Switch. Otherwise, it will not work.
You may have noticed the Metal Mario armature on the left of Mario. That's the model the game switches to upon equipping the Metal Cap. Like what was discusssed previously, the game cannot switch out two materials at once. "But wait," you ask, "I thought the metal wings went unused?" They do! However, since some mods take use of the metal wing cap, it's best to account for it anyway.
An easy way to create a new metal armature of your character is to take your current model and armature, including the hand and head switch armatures, and duplicate them! I change the duplicated armature and switch armatures to have ".Metal" as a suffix, to help keep things organized. For every material that isn't the wings, replace and assign them with one Metal material. Replace the wings with the Metal Wing materials. Do this for the rest of the relevant switch armatures, too. Afterward, in the main armature, you will have to change some bones around.
In the main metal armature, delete the Shadow, Scale, 0 Mirror Mario Backface Function, 1 Mirror Mario Alpha Function, and 3 Mirror Mario Backface Clear Function bones. You can do this by selecting the relevant bones and pressing the X hotkey, prompting you to dissolve the bones. Then, rename the 2 LoD Switch bone to Metal Mario Switch Option. Change the Geolayout command to Switch Option. Select the Cap State Switch bone and delete the last two options in its switch option list, leaving only one.
Select the main, non-metal armature and select its Cap State Switch bone. For the last two options, change the armature to the new main metal armature you created. You now should have a functioning, custom metal armature!
Assuming everything went well, congratulations!! You're ready to export the model! When exporting, be sure that the directory is set to a folder titled "actors" your the mod folder. For example, I should be exporting a model to the path SM64COOPDX/mods/My Mod/actors. Be sure to set the folder name, texture include path, and Geolayout name as well! When setting the Geolayout name, set the name to something you don't think anyone else will use. I tend to set it to character_skl_geo, signifying the model was created and exported by me. This also makes sure to prevent conflict with other mods that may make the same character.
If everything's exported correctly, you should now have a folder in the actors folder of your mod, and we can progress to the final step!
"What!? But I thought we set that up earlier!" You're right, we did! But there's one more thing we have to do. Well, two more things.
In that folder that was created upon exporting, you'll want to open up your model's geo.inc.c and model.inc.c files in a text editor. To let the game properly recolor these models, we'll have to edit some lines of code. It's nothing major, thankfully.
In the GEO file, scroll to the bottom. You should see a large block of code. Scroll up until you see the beginning, prefixed with const GeoLayout and then your Geolayout name that you set earlier. Find the first GEO_SCALE() command, and after the GEO_OPEN_NODE() command, insert the following block of text:
GEO_ASM(LAYER_OPAQUE + 3, geo_mario_set_player_colors),
GEO_ASM(LAYER_ALPHA + 3, geo_mario_set_player_colors),
GEO_ASM(LAYER_TRANSPARENT + 3, geo_mario_set_player_colors),
This makes it so that your character model can fetch the color slots to apply. If your model uses Cutout and Transparent layers and materials, replace GEO_ASM(0, geo_mirror_mario_backface_culling), with this:
GEO_ASM(LAYER_OPAQUE << 2, geo_mirror_mario_backface_culling),
GEO_ASM(LAYER_ALPHA << 2, geo_mirror_mario_backface_culling),
GEO_ASM(LAYER_TRANSPARENT << 2, geo_mirror_mario_backface_culling),
Then, replace GEO_ASM(1, geo_mirror_mario_backface_culling), with the following:
GEO_ASM((LAYER_OPAQUE << 2) | 1, geo_mirror_mario_backface_culling),
GEO_ASM((LAYER_ALPHA << 2) | 1, geo_mirror_mario_backface_culling),
GEO_ASM((LAYER_TRANSPARENT << 2) | 1, geo_mirror_mario_backface_culling),
After that, you may save your GEO file and go to your MODEL file. Press Ctrl+F and search for lines containing gsSPSetLights1(. For materials you want to be recolorable, you'll want to replace this function with gsSPCopyLightsPlayerPart() instead. Replace the material name within the brackets to the material slot you'd like instead. If you'd like the metal to be recolorable, do this with the metal material as well, but set the slot to CAP. Then, once that's done, you may save.
If everything's done correctly, you should now have a functioning custom model!! But how do we load it?
For this, you'll need Character Select for SM64COOPDX. This will allow you to load up a custom character to play.
In your mod folder, create a file titled main.lua. In this file, give it the following code:
Change the relevant properties in this lua file and save. Optionally, you can create a folder in your mod folder called textures and put in a 16 by 16 pixel image, representing your character. If all goes well, you should be able to play as your character!
If your character does not load and shows "ERROR" or an empty armature, it means either something went wrong with the exporting process or the LUA code is pointing to the wrong file. Please be sure to double-check.
And... viola! You have a custom character now!! Whoopee!!! Yahoo!!!! Hopefully this was helpful and gave some insight on my workflow regarding SM64 character mods. Happy modding!
Throughout my time of creating character models, there's a few common issues I've seen others run into. Here's the issues and fixes I've found for them!
There's a high chance you may run into some issues regarding the Vanish Cap. Each problem is slightly different and requires different solutions, some being ridiculously easy and others being ridiculously tedious.
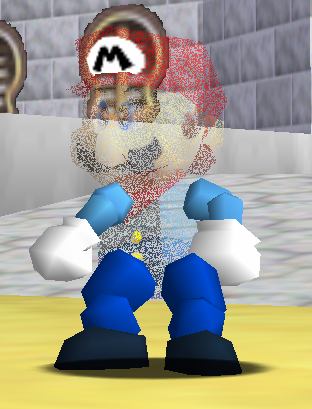
A common bug is your character's limbs being unaffected by the Vanish Cap. This is a material issue; a material isn't compatable with the Vanish Cap settings. This is almost always a transparent material.
Unfortunately, you may have to play "process of elimination" with determining the specific material if you have more than one transparent material. My method is to set all transparent material slots to an opaque, non-transparent material, export, and aquire the Vanish Cap. Then, slowly add back each material, and when the bug happens, that's your culprit.
To fix the material, set the material's settings to a Fast 3D preset, like Sm64 Shaded Texture Cutout. Then, if needed, go into the Geo tab and check the Cull Back option. This should fix the problem.
A classic, frustrating bug is the Vanish Cap material leaking outside of your character and into the rest of the game's transparent and cutout textures. A common way to determine if this is affecting your mod is to check the shadow of your character. If it also is affected by the Vanish Cap texture, you have a material leak.
There's two methods to fix this. One is to simply update Fast64 to its latest version and re-export the model. The other requires you to edit your exported files, which can be very tedious.
...Alright, sure, I'll explain the annoying way.
In the geo.inc.c file of your model, search for the second to last GEO_CLOSE_NODE() command. Replace this with the following:
GEO_CLOSE_NODE(),
GEO_DISPLAY_LIST(LAYER_OPAQUE, mario_material_revert_render_settings ),
GEO_DISPLAY_LIST(LAYER_ALPHA, mario_material_revert_render_settings),
GEO_DISPLAY_LIST(LAYER_TRANSPARENT,  mario_material_revert_render_settings)
You'll see a material in this code named mario_material_revert_render_settings. I suggest replacing "mario" with the internal name of your character (i.e. "character_skl" from earlier).
In geo_header.h, at the very end, paste extern Gfx mario_material_revert_render_settings[]; into the end of the file. Make sure the material name matches with what you put in geo.inc.c earlier.
Finally, paste this in at the end of your model.inc.c file (once again, mind the material name):
This should fix your issue! If not, please oh please just update your Fast64 and re-export I beg of you.
When looking in the mirror room, you may notice some textures missing from your character. This is because the game is lacking code to reflect the Transparent and Cutout layers. In the original game, because Mario only ever has Decals and Solids as materials and textures, this was never a problem. See Recoloring Model's section and make sure to add the additional code for Cutout and Transparent layers to work in mirrors.
You may notice your character's sideburn color change upon another player existing on-screen. This is because only a portion of the recoloring code was copied into geo.inc.c. It successfully copies a player's color, but incorrectly applies it to the wrong model. See Recoloring Model's section to make sure you copied all of the recolor code.
EDIT 2024/7/27: Edited parts of the tutorial to be more accurate and fixed some errors!
EDIT 2024/8/4: Added a section for common issues and how to fix them!